After my last series of posts about ArduinoFX (Java Embedded on the Raspberry Pi with sensors, Arduino and XBee, and a JavaFX based client app, monitoring the measures), it happened that Oracle released JDK 8 (with JavaFX) for ARM Early Access, and finally we all could try JavaFX on our Rasperry Pi.
It also happened that I left the NXTLegoFX post pending...
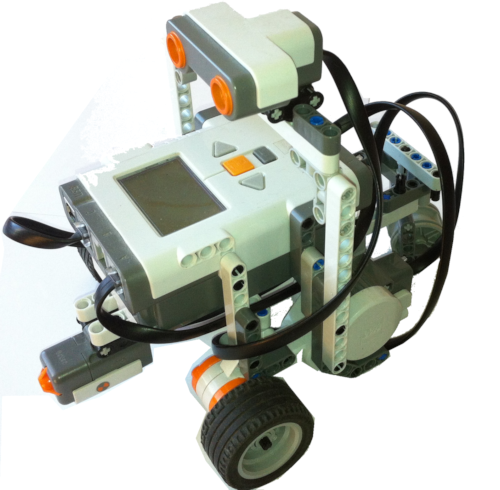
But, now, with JavaFX running on the Raspberry Pi I had to give it a try, so I decided to use again my kid's Lego Mindstorms NXT 2.0 to have something real to interact with, and resume in part the pending post.
And just at the time of finishing this post, Lego unveiled their new version EV3 for the summer of 2013... so before ditching the NXT, let's have some fun with it!
A few months ago I bought a NXTBee, the naked version without XBee, from Dexter Industries. Please, read their wiki with further explanations, and their downloads section, to find NXT-G blocks for the official NXT firmware.

It's like the XBee shield for Arduino, but for the NXT. So the project was clear to me: connect wirelessly the NXT with the Raspberry Pi via serial communication, and develop a JavaFX based application for the Pi. No server required this time.
Here you have a little overview:

And this is the bill of materials:

Disclaimer: I'm not responsible in any way for what you do on your spare time with what I say here! The following procedures are provided without any warranty. Also, you should know by now that I'm not related to any of the companies mentioned in this blog.
1. LeJOS and NXTBee
I've already talked about leJOS, so you'll know by now it's a firmware that replace the NXT one, including a tiny Java Virtual Machine, so it allows you to program the robot with Java. Please, check this for detailed explanation.
The official distribution (by now 0.9.1 beta 3) was released in February 2012 and it didn't have the classes required to interact with the NXTbee.
Fortunately, Mark Crosbie has developed NXTBee, a leJOS class to interact with the NXTBee, along with some sample Java code in leJOS showing how to send and receive data. Basically, the NXTBee, attached to Port 4 of the NXT, uses a RS485 serial link. The NXTBee class uses a thread as a data pump, continually polling the RS485 port and storing data received on the port in an internal circular buffer, and reading data from the circular buffer and writing it onto the RS485 port. It returns an InputStream and an OutputStream object which can be used by programs to read and write data to and from the NXTBee.
His work has been included for future versions of leJOS, and you can find it in their repository. For now, in our projects, we just need to include NXTBee.java and CircularByteBuffer.java with the rest of our classes, before compiling and downloading to the NXT.
Test #1. Read from and write to NXT
So as a first test we'll just check communication to and from the NXT with the NXTBee and a XBee, to other XBee plugged to the PC via XBee Explorer, with the help of X-CTU software (or equivalent hyperterminal like program).
Please, first read how to set the proper configuration of the XBee antennas here, in case you haven't done it yet, and change the DL parameter in the Coordinator XBee #1:
- Addressing. DL: Destination Address Low: FFFF
Now, in Netbeans, we'll make a new project, apart from the leJOS samples project. For that, follow these steps:
1. In your usual Java projects folder, create a new folder named NXTBeeTest1, and copy build.properties and build.xml files you'll find in the folder LeJOS NXJ Samples\org.lejos.example. Also, create a src folder inside.
2. In Netbeans, choose New Project->Java->Java Free Form Project. In Name and Location step, browse to the NXTBeeTest1 folder. Change project name to NXTBeeTest1.

In Build and Run Actions step, in Run Project, select uploadandrun. In Source Package Folders step, press Add Folder, and select src folder. Finally, in Java Sources Classpath step, press Add Jar/Folder, and browse to C:\Program Files\leJOS NXJ\lib\nxt\classes.jar. Click finish.

3. In the src folder, create package lejos.nxt.addon, download NXTBee.java from here and add it there. Also, create package lejos.internal.io and download CircularByteBuffer.java from here to that folder. Create package org.lejos.jpl.nxtbee and add a new class, NXTBeeTest1 with the following code:
public static void main(String[] args) {

    NXTBee nb = new NXTBee(9600, true, true);

    Thread t = new Thread(nb);
    t.setDaemon(true);
    t.start();

    //
    // PART 1. SEND DATA FROM XBEE #1, RECEIVE IT IN XBEE #2 WITH NXTBEE
    // Press RIGHT on the NXT to finish Part 1
    //
    InputStream is = nb.getInputStream();
    DataInputStream dis = new DataInputStream(is);

    Delay.msDelay(1000);

    LCD.clear();
    LCD.drawString("NXTBee Receiving", 0, 0);

    byte[] b = new byte[20];
    try {
        while(Button.RIGHT.isUp()){
            if(dis.available() > 0) {
                int bytesRead = dis.read(b);
                LCD.drawString("Read " + bytesRead + " bytes",0, 3);
                String s = new String(b);
                LCD.drawString(s, 0, 5);
            }
            Delay.msDelay(1000);
        }
    } catch(Exception e) {}
    try {
        dis.close();
    } catch (IOException ex) {}

    //
    // PART 2. SEND DATA FROM XBEE #2 WITH NXTBEE, RECEIVE IT IN XBEE #1
    // Press ENTER on the NXT to finish Part 2
    //
    OutputStream os = nb.getOutputStream();
    DataOutputStream dos = new DataOutputStream(os);

    SensorPort sp = SensorPort.getInstance(0);
    TouchSensor touch = new TouchSensor(sp);

    LCD.clear();
    LCD.drawString("NXTBee Sending", 0, 1);

    try {
        while(Button.ENTER.isUp()){
            if (touch.isPressed()){
                LCD.drawString("Touch on ", 0, 2);
                dos.writeBytes("Touch on");
            } else {
                LCD.drawString("Touch off ", 0, 2);
                dos.writeBytes("Touch off");
            }
            dos.writeByte(13); dos.writeByte(10); // CRLF
            Delay.msDelay(2000);
        }
    } catch(Exception e) { }
    try {
        dos.close();
    } catch (IOException ex) {}
}
4. Edit build.properties and change these two lines:
main.class=org.lejos.jpl.nxtbee.NXTBeeTest1
output.basename=NXTBeeTest1
Edit build.xml and change description:
<project name="NXTBeeTest1" default="uploadandrun">
<description>org.lejos.jpl.nxtbee.NXTBeeTest1 build file</description>
Now, plug XBee #2 to the NXTBee, and this one to sensor port #4 on the NXT brick. In port #1 attach also the Touch sensor.
Finally connect the NXT brick to your PC by USB or by Bluetooth and switch on the NXT. Run project. If everything is alright, it should build and download NXTBeeTest1 to the NXT, and start the first part: In the NXT LCD screen you should see "NXTBee Receiving".

Now, plug the XBee #1 to your PC, via XBee Explorer, and open X-CTU. Read the XBee and go to Terminal tab. Write something, like "Test1". It should appear on the NXT LCD display:

Press firmly the right button on your NXT, and now you should see on the terminal tab the status of the touch sensor (press and release a few times).

2. Robotics: Arbitrator and Behavior
To introduce some robotic way of thinking in our project we can examine the sample BumperCar distributed with the samples bundle. It requieres a wheeled vehicle with two independently controlled motors connected to motor ports A and C, and a touch sensor connected to sensor port 1 and an ultrasonic sensor connected to port 3.
So we build this simple robot. You can follow this fantastic guide, and finally add the ultrasonic sensor.
As we can read here, the concepts of Behavior Programming as implemented in leJOS NXJ are very simple:
- Only one behavior can be active and in control of the robot at any time.
- Each behavior has a fixed priority.
- Each behavior can determine if it should take control.
- The active behavior has higher priority than any other behavior that should take control.
- boolean takeControl() indicates if this behavior should become active, returning quickly without performing long calculations.
- void action() performs its task when the behavior becomes active. A behavior is active as long as its action() method is running, so the action() method should exit when its task is complete, or promptly when suppress() is called.
- void suppress() immediately terminates the code running in the action() method. It also should exit quickly.
Whent its start() method is called, it begins arbitrating: deciding which behavior will become active. For that, it calls the takeControl() method on each Behavior object, starting with the object with the highest index number in the array, till it finds a behavior that wants to take control. If the priority index of this behavior is greater than that of the current active behavior, the active behavior is suppressed.
In the bumpercar sample, there are two behaviors. The first one defines its primary task, drive forward, and the second orders the robot to reverse and turn whenever the touch sensor strikes an object, or the ultrasonic sensor gets an echo from a close object, with priority over the first behavior:
Behavior b1 = new DriveForward(); // low priority
Behavior b2 = new DetectWall();   // high priority
Behavior[] behaviorList = {b1, b2};
Arbitrator arbitrator = new Arbitrator(behaviorList);
arbitrator.start();
Test #2 The BumperCar
This test is quite simple: if you have built the bumpercar, just run samples project, type "bumpercar" in the dialog, wait till it's downloaded, press a button on your NXT to start, and test if it behaves as expected.
3. Serial communication with the NXT
Now let's insert a new behavior in our robot, one that takes care of remote communication with the NXT, so we can override its autonomous behavior, providing manual control. A rear touch sensor will be added.
We create a new Java Free Form Project, named NXTBeeNXT, in the very same way as in the previous test1 with NXTBeeTest1.
First of all we'll add Brick, a singleton class to wrap the NXT motors and sensors, so they can be accessed from any behavior. Also, from this class any change in the robot status will be notified to the PC or Raspberry Pi, via XBee.
Then we add three behaviors: DriveForward, Remote and DetectWall.
Finally we define the main class, NXTBeeNXT.
Here you can see part of the Remote code. It just listens for commands from the inputstream and takes control or perform actions accordingly. In case an obstacle is found, this behavior will be suppressed and its action will be stopped:
public class Remote implements Behavior
{
    private DataInputStream dis;
    private boolean _suppressed = false;
    private String s;

    public Remote(DataInputStream dis){
        this.dis=dis;
    }

    public boolean takeControl()
    {
        if(Brick.getInstance().isStopped()){
            // cancel all behaviors, stop the arbitrator
            return false;
        }

        if(Brick.getInstance().getBehState()==Brick.state.MANUAL){
            // Take control if we're in Manual mode, don't read remote orders here
            return true;
        }

        // Read remote orders from PC/Raspi
        byte[] b = new byte[20];
        try {
            if(dis.available() > 0) {
                dis.read(b);
                s = new String(b);
            }
        } catch(Exception e) {}

        // Take control if orders are Stop or change from Auto (driving forward) to Manual mode
        return s!=null && (s.startsWith(Brick.STOP) || s.startsWith(Brick.MANUAL));
    }

    public void suppress()
    {
        _suppressed = true;
    }

    public void action()
    {

        _suppressed=false;

        LCD.clearDisplay();
        if(s.startsWith(Brick.STOP)){
            // Notify Stop order
            Brick.getInstance().setBehState(Brick.state.STOPPED);
            LCD.drawString("Bumper Car STOP",0,1);
        } else if(s.startsWith(Brick.MANUAL)){
            // Notify order to enter in Manual Mode
            Brick.getInstance().setBehState(Brick.state.MANUAL);

            // Start reading serial port and process the orders
            byte[] b = new byte[20];
            try {
                // This action will be suppressed if the robot finds an obstacle
                while(!_suppressed) {
                    if(dis.available() > 0) {
                        dis.read(b);
                        s = new String(b);
                        if(s.startsWith(Brick.LEFT)){
                            LCD.drawString("LEFT    ",0,3);
                            // start Motor.C rotating forward, with A stopped, so
                            // the robot turns left
                            Brick.getInstance().getLeftMotor().stop();
                            Brick.getInstance().getRightMotor().rotate(360, true);
                        } else if(s.startsWith(Brick.RIGHT)){
...
                        } else if(s.startsWith(Brick.AUTO)){
                            LCD.drawString("AUTO    ",0,3);
                            // Return to Auto mode. Motors are stopped
                            Brick.getInstance().getLeftMotor().stop();
                            Brick.getInstance().getRightMotor().stop();
                            // Notify forward (auto) state
                            Brick.getInstance().setBehState(Brick.state.FORWARD);
                            // ends the action
                            _suppressed=true;
                        }
                    }
                    Delay.msDelay(500);
                }
            } catch(Exception e) { }
        }
        s="";
    }
}
All the code for this project can be found in my GitHub repository here.
Test #3 The remotely controlled BumperCar
We add to the bumpercar a second touch sensor, to look for obstacles when the robot moves backward in Manual mode, plugged to port #2. The XBee #2 must be plugged to the NXTBee and this should be plugged to port #4 on the NXT.

If you've just clonned the code from the repository, open the project, and run it, with your NXT switched on. After it has been compiled, built and downloaded, it will start and you'll see in the NXT display "NXTBee waiting...". Leave the NXT on the floor, in a relative clear wide area.
Now plug XBee #1 in the USB port of your PC, via XBee Explorer, and open X-CTU, read the modem configuration and go to Terminal tab. Now press 'S' to start Auto mode in the NXT. Let the BumperCar find some obstacles and react to them. Press 'P' to Stop in case something is wrong, and 'Q' to quit the program. On the NXT, from files menu, select NXTBeeNXT.nxj and click Enter. Now press again 'S' and enter in manual mode with 'M'. Now you can press:
- 'F' to move forward,
- 'B' to move backward,
- 'L' to turn left,
- 'R' to turn right,
- 'V' to speed up,
- 'W' to speed down and
- 'A' to go to Auto mode
The red numbers appering on the terminal screen after commands are typed are the echo back from the NXT notifying its status: 0 means stopped, 1 driving forward, 2 wall detected and 3 manual mode.
Note that if you drive manually against any obstacle, DetectWall behavior will override your control, trying to avoid the obstacle and returning to auto mode.

4. JavaFX for Raspberry Pi
To run JavaFX on the Raspberry Pi, you'll need a hard float Raspbian version. I covered here how to install the soft float version, so follow the same instructions again, but now with this hard float version 2012-12-16-wheezy-raspbian.zip. When the Pi boots for the first time, in the config menu option memory_split, now you should give 128 MB to video.
At the first login, edit /boot/config.txt file and uncomment these two lines, and select the resolution of your display:
framebuffer_width=1280
framebuffer_height=1024
There are already several blogs out there covering how to install Java in a hard float Raspbian Wheezy version, like this or this. Basically you have to follow these steps:
1. Download Oracle JDK 8 (with JavaFX) for ARM Early Access from here in your PC. With ssh, copy the file to a folder in your Pi, like /home/pi/Downloads/. In a terminal window in your PC, or in the Pi, run these commands:
mkdir -p /opt
cd /home/pi/Downloads
sudo tar zxvf jdk-8-ea-b36e-linux-arm-hflt-29_nov_2012.tar.gz -C /opt
rm jdk-8-ea-b36e-linux-arm-hflt-29_nov_2012.tar
If you type /opt/jdk1.8.0/bin/java -version, you should see "java version '1.8.0-ea'".
2. Download JavaFX samples from here. Copy the file to /home/pi/Downloads by ssh. Run in a terminal window:
cd /home/pi/Downloads
unzip javafx_samples-8_0_0-ea-linux.zip
rm javafx-samples-8.0.0-ea.zip
mv javafx-samples-8.0.0-ea /home/pi/javafx
And that's all!
Test #4. JavaFX sample
Now we can test several of the included samples. Note that, for the moment, the application takes the whole screen and you can't quit if it doesn't have a button for it.
So one way to do it is running your sample from a terminal window in a VNC session. You'll see the application in your display connected with HDMI to the Pi, and all the text output (System.out, System.err) in your terminal window. And you can kill the application anytime with Ctrl+C, or with ps -a, find the id of the java application and type kill <javaid>.
To run the sample, plug a mouse in your Pi, and type this line in the terminal window:
sudo /opt/jdk1.8.0/bin/java -Djavafx.platform=eglfb -cp /opt/jdk1.8.0/jre/lib/jfxrt.jar:/home/pi/javafx/StopWatch.jar stopwatch.MainScreen

Press Ctrl+C to finish.
5. Pi4J library
The Pi4j project is intended to provide a bridge between the native libraries and Java for full access to the Raspberry Pi, so you can easily access to GPIO pins for your Java project.
To install the library, follow these steps:
sudo wget http://pi4j.googlecode.com/files/pi4j-0.0.5-SNAPSHOT.deb
sudo dpkg -i pi4j-0.0.5-SNAPSHOT.deb
It will install in /opt/pi4j/lib four jars. Also, in /opt/pi4j/examples you'll find several samples.
Test #5. Control GPIO
Before testing the first sample, please review the GPIO pins labelling here.
Now add a LED with a 330 Ω pull-up resistor in a breadboard, and connect anode to pin #1 and cathode to GND.

On your Pi, compile the sample first:
cd /opt/pi4j/examples
sudo /opt/jdk1.8.0/bin/javac -classpath .:classes:/opt/pi4j/lib/'*' ControlGpioExample.java
And now run it:
sudo /opt/jdk1.8.0/bin/java -classpath .:classes:/opt/pi4j/lib/'*' ControlGpioExample

6. The JavaFX application
Finally, we'll design the JavaFX GUI application to remotely control the BumperCar from the Raspberry Pi.
The first thing we should do is install jdk1.8.0-ea in our PC, so we can use our favourite IDE to develope and build the project. Then, we only need to send the jar to the Pi and test it. For that:
1. Unzip jdk-8-ea-b36e-linux-arm-hflt-29_nov_2012.tar.gz in a folder, like C:\Java.
2. In Netbeans go to Tools, select Ant Variables, click Add, and define J8_HOME and browse to the folder "C:\Java\jdk1.8.0".
3. Create a new JavaFX FXML Application, named NXTBeeFX, and open build.xml. Add at the end this target:
<target depends="-pre-init,-init-private" name="-init-user">
    <property file="${user.properties.file}"/>
    <property name="javac.compilerargs" value="-bootclasspath ${var.J8_HOME}/jre/lib/rt.jar"/>
    <property name="javac.classpath" value="${var.J8_HOME}/jre/lib/jfxrt.jar:
       ${var.J8_HOME}/jre/lib/ext/RXTXcomm-2.2pre2.jar:
       ${var.J8_HOME}/jre/lib/ext/pi4j-core.jar"/>
    <!-- The two properties below are usually overridden -->
    <!-- by the active platform. Just a fallback. -->
    <property name="default.javac.source" value="1.6"/>
    <property name="default.javac.target" value="1.6"/>
</target>
4. Add RXTXcomm-2.2pre2.jar and pi4j-core.jar to the project. Copy them from your Pi to your PC, by ssh, from /usr/share/java and /opt/pi4j/lib.
Now edit NXTBeeFX.fxml in the JavaFX Scene Builder, and add the buttons and labels required:

There'is one issue I've found while creating this app: you can't apply InnerShadow or DropShadows effects. If you do, you'll get a RuntimeException. A bug has already been filed: http://javafx-jira.kenai.com/browse/RT-27464.
Now, in NXTBeeFXController, we create the methods for the buttons, and initialize those from the manual panel to change the text label to a graphic icon:
btnRight.setId("key-button");
icon = new Label();
icon.getStyleClass().add("arrowRight");
btnRight.setText(null);
btnRight.setGraphic(icon);
btnRight.setPrefSize(50, 50);
taken from a SVG path, defined in the css file:
#key-button.button .arrowRight {
    -fx-shape: "M 14.007057,41.909369 C 2.3562491,41.605509 12.432093,7.29355
                31.877087,12.49765 l 0,-9.3754104 16.648482,14.5865794
                -16.648482,15.29753 0,-9.66838 c -15.93811,-5.71097
               -9.177528,18.43258 -17.87003,18.5714 z";
    -fx-translate-x: -6;
    -fx-translate-y: -4;
}
Another issue I've found is that the icon is centered in the button at it's expected when running on my PC, but on the Raspberry Pi it appears to the right and to the bottom of the button, so that's the reason for translating it back to the center.
So this is how the manual panel looks like after a little bit of styling:

In the initialize method, we also start a thread to read the serial port (via XBee) and get all the responds from the NXT.
// Initialize Serial Port, with the XBee #1 connected on the USB port

serial=new Serial();
try {
    System.out.println("Connecting to serial port...");
    serial.connect( "/dev/ttyUSB0" );
} catch( Exception e ) {
    System.out.println("Error connecting to serial port: "+e.getMessage());
}

//
// Service to start reading serial port for NXT Status
// It will stop and close when requested
//
serviceSerial=new Service<Void>(){

    @Override
    protected Task<Void> createTask() {

        return new Task<Void>(){

            @Override
            protected Void call() throws Exception {
                System.out.println("start reading...");
                serial.read();
                return null;
            }
            @Override protected void cancelled() {
                System.out.println("cancelling...");
                serial.disconnectInput();
                super.cancelled();
            }
        };
    }
};
serviceSerial.start();
Also, the GPIO pines are initialized, to set an alarm in case the NXT finds an obstacle.
    // create gpio controller
    final GpioController gpio = GpioFactory.getInstance();

    // provision gpio pin #01 as an output pin
    final GpioPinDigitalOutput pinRed =
       gpio.provisionDigitalOutputPin(RaspiPin.GPIO_01, "MyLEDRed", PinState.LOW);

    // provision gpio pin #07 as an output pin
    final GpioPinDigitalOutput pinGreen =
       gpio.provisionDigitalOutputPin(RaspiPin.GPIO_07, "MyLEDGreen", PinState.LOW);

    public void setAlarmOn() {
        pinRed.high();
        pinGreen.low();
    }

    public void setAlarmOff() {
        pinRed.low();
        pinGreen.high();
    }
Note that a second LED is added to pin 7.

All the code for this project can be found in my GitHub repository here. Clone it, build it, and then you must send the jars to the Pi, by ssh:

To run the project you can create a file typing nano bash.sh. There you should type:
#!/bin/bash
sudo /opt/jdk1.8.0/bin/java -Djavafx.platform=eglfb -Djava.library.path="/usr/lib/jni" -cp /opt/jdk1.8.0/jre/lib/jfxrt.jar:/home/pi/javafx/NXT/RXTXcomm-2.2pre2.jar:/home/pi/javafx/NXT/pi4j-core.jar:/home/pi/javafx/NXT/NXTBeeFX.jar nxtbeefx.NXTBeeFX
Save (Ctrl+O) and exit (Ctrl+X). Now check all is in place and you can run it:
/home/pi/Downloads/javafx/NXT/bash.sh


CONCLUSION
As a short conclusion after this long post, let me just say that JavaFX on the Raspberry Pi performs really well, being just an Early Access release. It will be improved and several issues will be fixed, and things that were not included, like media, will be in.
So if you have a Raspberry Pi, don't wait any longer and start testing your JavaFX apps.
Again, leJOS has proved to be a really mature platform, enabling a really easy integration between Java/JavaFX and robotics applications for Lego Mindstorms NXT.
Finally, in this video you'll find most of the details I've been talking about in this post.
If you have the chance, take your NXT, grab the code, and give it a try! Any comment will be absolutely welcome.
Really nice post...keep it up Jose...
ReplyDeleteCheers,
Gerrit
Thank you, Gerrit, hope the tests and the code will cheer people up and they give it a try. Those without NXT could try JavaFX on their Raspberry Pi, and those with the NXT but without XBee should try remote control via USB...
DeleteVery cool work. Nice to see Java used is such cool ways. I will surely give most of your code a whirl.
ReplyDeleteThank you, Gary! Please, do, any feedback would be really appreciated
ReplyDeleteNice Post Jose,
ReplyDeleteI need some help please. Is it possible to run a javafx app which has pi4j on a windows machine?
I am trying to work on an app for a school project and i started with a basic led switching javafx app for a raspberry pi.
When i run it on windows i get errors on my buttons that are suppose to run pi4j methods. I am not sure what i did wrong. Can you assist please?
https://github.com/nstephane/LedSwitch.git
Hi Stephane
DeleteYou can't run Pi4J on Windows since it's intended to run on a Linux system. Anyway, you need to review your code, since in FxmlControl you don't initialize Gpio pin!
Best,
Jose